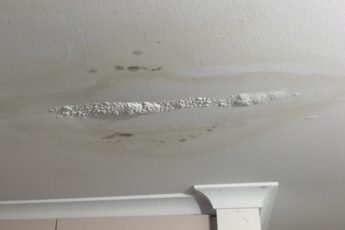
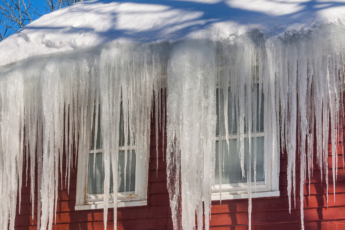
Expert tips from 911 Roofing team to inspect your roof for damages and maintenance

From Shingles to Gutters: A Step-by-Step Roofing Inspection Guide for Homeowners

When it comes to maintaining your home, an often overlooked area is the roof. However, regular roof inspections are essential to ensure its longevity and prevent costly repairs down the line. In this comprehensive step-by-step roofing inspection guide, we will take you through the process of examining your roof, from checking the condition of shingles to inspecting gutters for signs of damage or clogging.

With our expert tips and guidance, you’ll learn how to identify common issues such as missing or damaged shingles, leaks, and deteriorating flashing. We’ll also provide insights into how to assess the overall health of your roof and determine when it may be time for repairs or a full replacement.

By following our easy-to-understand instructions, homeowners can gain peace of mind knowing that their roofs are in good shape and protected against the elements. Don’t wait until it’s too late – empower yourself with the knowledge and tools to keep your roof in top condition.

Stay tuned for our step-by-step roofing inspection guide – your go-to resource for keeping your home safe and secure.

Importance of Regular Roofing Inspections

Regular roofing inspections are vital to maintaining the integrity of your home. Roofing materials can deteriorate over time due to weather conditions, age, and other factors. By inspecting your roof on a regular basis, you can catch any issues early on and prevent them from escalating into more significant problems.

During a roof inspection, you can identify damaged or missing shingles, leaks, and signs of water damage. This allows you to take prompt action and address these issues before they cause further damage to your home’s structure or interior. Additionally, regular inspections can help extend the lifespan of your roof, saving you money on costly repairs or premature replacement.

To ensure a thorough inspection, it’s important to have the right tools on hand.

Tools Needed for a Roofing Inspection

Before you begin your roofing inspection, gather the necessary tools to make the process easier and more efficient. Here are some essential tools you’ll need:

1. Ladder: A sturdy ladder is essential for accessing your roof safely. Make sure the ladder is in good condition and positioned securely before use.

2. Safety Equipment: Wear appropriate safety gear, including non-slip shoes, gloves, and safety glasses, to protect yourself during the inspection.

3. Flashlight: A flashlight will help you illuminate dark areas, such as the attic or under eaves, allowing you to spot potential issues.

4. Binoculars: Binoculars can be useful for inspecting the roof from the ground, especially for larger or multi-story homes.

5. Camera: Use a camera or smartphone to document any findings or areas of concern. This will enable you to compare the condition of your roof over time.

Now that you have the necessary tools, let’s dive into the step-by-step process of inspecting your roof.

Exterior Inspection: Shingles and Roof Condition

Start your inspection by examining the exterior of your roof and assessing the condition of the shingles. Here’s what to look for:

1. Missing Shingles: Scan the roof for any areas where shingles are visibly absent. Missing shingles can leave the underlying layers vulnerable to water damage and should be replaced promptly.

2. Curling Shingles: Check for shingles that are curling at the edges or lifting away from the roof. Curling shingles are a sign of wear and may indicate the need for a roof repair or replacement.

3. Cracked Shingles: Inspect the shingles for any cracks or fractures. Cracked shingles can allow water to seep into your home and lead to further damage.

4. Buckling Shingles: Look for shingles that appear wavy or buckled. Buckling can occur when the roof’s underlayment is not properly installed or due to excessive heat and moisture.

5. Moss or Algae Growth: Note any areas where moss or algae are growing on the roof. While not directly harmful, moss and algae can trap moisture and accelerate shingle deterioration.

If you notice any of these issues, it’s important to address them promptly to prevent further damage. Next, we’ll discuss how to check for leaks and water damage.

Checking for Leaks and Water Damage

Water damage can wreak havoc on your home’s structure and lead to costly repairs. Therefore, it’s crucial to check for leaks and signs of water damage during your roof inspection. Here’s how to do it:

1. Inspect the Attic: Start by examining the attic for any signs of water infiltration. Look for water stains, damp insulation, or visible drips. These indicate that your roof may be leaking. Use a flashlight to thoroughly examine the entire attic space, paying close attention to areas around vents, chimneys, and plumbing pipes.

2. Check Ceilings and Walls: Inspect the ceilings and walls inside your home for any water stains or discoloration. These can be indicators of a roof leak. If you notice any stains, trace them back to their source on the roof to determine the extent of the damage.

3. Examine Eaves and Fascia: Take a close look at the eaves and fascia boards for signs of water damage, such as rotting or warping. These areas are particularly vulnerable to water infiltration and can indicate underlying issues with your roof’s drainage system.

4. Observe Gutters and Downspouts: Check the gutters and downspouts for any signs of water backup or overflow. Clogged or damaged gutters can cause water to pool on your roof, leading to leaks and potential structural damage. Clean your gutters regularly and ensure proper drainage away from your home’s foundation.

Identifying and addressing leaks and water damage early on can save you from more extensive repairs in the future. However, it’s not just the roof itself that requires inspection – the gutters and downspouts should also be examined.

Inspecting the Gutters and Downspouts

Gutters and downspouts play a crucial role in directing water away from your roof and foundation. Regular maintenance and inspection of these components are necessary to ensure proper drainage. Here’s how to inspect your gutters and downspouts:

1. Clean the Gutters: Before inspecting, clean out any debris or leaves from the gutters. This will allow you to get a clear view of their condition and ensure that water can flow freely.

2. Check for Damage: Inspect the gutters for signs of damage, such as cracks, rust, or sagging. Damaged gutters can lead to water overflow, which can cause damage to your roof and home’s foundation. Replace or repair any damaged sections promptly.

3. Ensure Proper Alignment: Check that the gutters are correctly aligned and securely attached to your home. Improper alignment can lead to water pooling or overflowing, which can damage the fascia, roof, and foundation. Adjust or reinstall the gutters as needed.

4. Inspect Downspouts: Examine the downspouts for any clogs or obstructions. Ensure that they are securely connected to the gutters and extend at least 3 feet away from your home’s foundation. Clogged or improperly positioned downspouts can cause water to accumulate near your foundation, leading to structural issues.

Regular gutter and downspout maintenance will help prevent water damage and ensure the proper functioning of your roof drainage system. Along with the gutters, it’s important to assess the condition of the flashing and chimney.

Assessing the Flashing and Chimney

Flashing is the material used to seal and protect areas of your roof that are vulnerable to water infiltration, such as around chimneys, vents, and skylights. Additionally, the chimney itself can be prone to damage. Here’s what to look for during your inspection:

1. Inspect Flashing: Examine the flashing around chimneys, vents, and skylights for signs of damage, such as cracks or gaps. Damaged flashing can allow water to seep into your home and cause leaks. Replace or repair any damaged flashing to maintain a watertight seal.

2. Check Chimney: Inspect the chimney for any signs of damage, such as loose bricks, cracks, or deteriorating mortar. These issues can allow water to penetrate the chimney structure, leading to leaks and potential structural damage. Consult a professional chimney inspector or mason if you notice significant damage.

Addressing any flashing or chimney issues promptly will help prevent water damage and maintain the integrity of your roof. However, it’s not just the exterior of your roof that requires inspection – the attic and ventilation should also be evaluated.

Evaluating the Attic and Ventilation

The attic and ventilation play a crucial role in maintaining the health of your roof. Proper ventilation helps regulate temperature and moisture levels, preventing damage caused by excessive heat or condensation. Here’s what to assess during your inspection:

1. Inspect Attic Insulation: Check the condition of the insulation in your attic. Proper insulation helps regulate temperature and prevents heat transfer between your home and the roof. Ensure that the insulation is evenly distributed and not compressed or damaged.

2. Evaluate Ventilation: Assess the ventilation system in your attic, including soffit vents, ridge vents, and exhaust fans. Proper ventilation allows for the exchange of air, preventing moisture buildup and reducing the risk of mold growth. Make sure vents are clear of obstructions and functioning correctly.

3. Look for Signs of Moisture: Check the attic for any signs of moisture, such as damp insulation, water stains, or mold growth. Excessive moisture can lead to roof damage and compromise the effectiveness of your insulation and ventilation. Identify and address the source of moisture promptly.

Maintaining a well-ventilated attic with adequate insulation is crucial for the health of your roof and overall home. However, it’s important to note that some aspects of a roof inspection may require the expertise of a professional.

Hiring a Professional Roofing Inspector

While homeowners can perform routine roof inspections, some aspects may require the expertise of a professional roofing inspector. Consider contacting a professional if:

1. You are unsure about the severity or extent of any roof damage.

2. You are unable to safely access your roof or navigate steep slopes.

3. Your home has a complex roof design or multiple levels.

4. You suspect significant underlying issues, such as structural damage or leaks.

A professional roofing inspector can provide a more thorough assessment and recommend appropriate repairs or maintenance. Additionally, they may uncover issues that an untrained eye might miss.

Conclusion: Maintaining Your Roof for Longevity and Safety

Regular roof inspections are essential for maintaining the integrity of your home and preventing costly repairs. By following this step-by-step roofing inspection guide, you can identify common issues such as missing or damaged shingles, leaks, and deteriorating flashing. Additionally, you’ll learn how to assess the overall health of your roof and determine when repairs or a full replacement may be necessary.

Remember to gather the necessary tools before starting your inspection, and proceed with caution, prioritizing your safety at all times. If you’re unsure about any aspect of the inspection or suspect significant damage, consider contacting a professional roofing inspector.

By taking proactive measures to maintain your roof, you can ensure its longevity and protect your home against the elements. Don’t wait until it’s too late – empower yourself with the knowledge and tools to keep your roof in top condition.

Stay tuned for more expert tips and resources on home maintenance and improvement from 911 Roofing Team. Your home deserves the best care, and we’re here to help you every step of the way.